How to Set Up a Speaker (Two-Way Audio/ Talk Down)
How to Set Up a Speaker (Two-Way Audio/ Talk Down)
2024-05-15
Version 2.0
Setting up an intercom system is simple with the Eagle Eye solution.
First ensure it's compatible by checking our Supported Device List.
If the device is not listed, follow our guide for Requesting Device Support.
Adding Devices
Once support is confirmed, log into the camera and ensure ONVIF is set up.
(For camera specific configuration settings refer to our guides: Hikvision, Axis)
Add the camera from the Available Cameras section of the Dashboard via the Green Plus icon.
Audio Configuration
Click Camera Settings.
Select Audio.
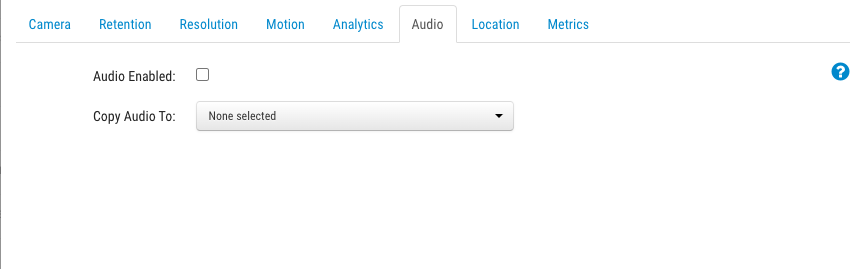
Select Audio Enabled.
If you want the same audio to play when viewing footage for another camera, it can be linked by using the Copy Audio To option.
If the camera has a built-in speaker it will automatically link to the camera. When viewing the live feed you will see a microphone icon.

Clicking the icon enables the User to speak from their device through the built-in speaker.
Configuring a speaker is similar to configuring a camera. ONVIF must be configured.
Click System.
Select ONVIF.

Add User with Admin credentials with the same login as the Speaker.
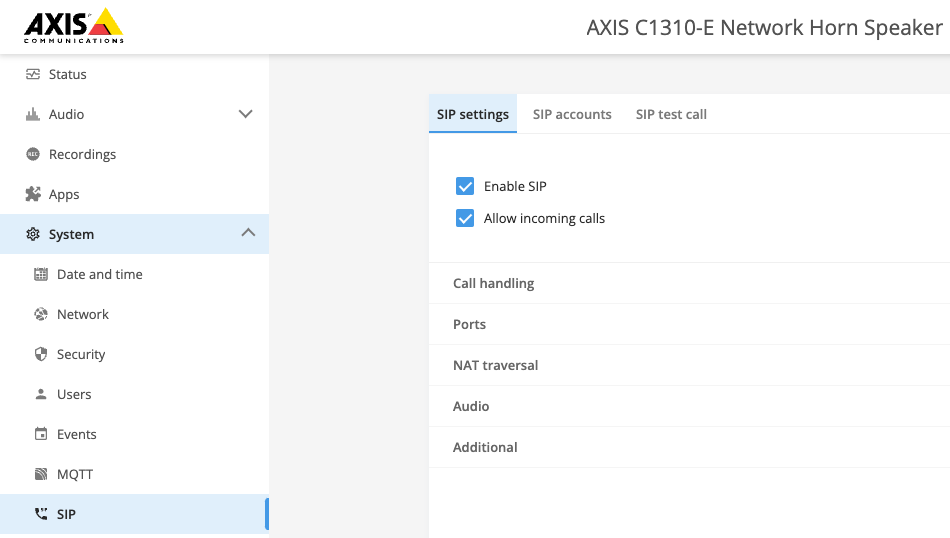
Set Up SIP
Click System.
Select SIP.
Select Allow incoming calls.
Click SIP accounts.
Click Add Account.
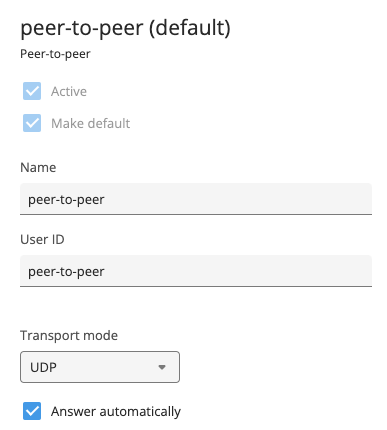
Create a User named peer-to-peer if no profile exists with the pictured settings.
Once the device is configured and added it needs to be linked to a camera.
Click Camera Settings.
Select Audio.
Fill out the SIP Username (and password if applicable).
Click and drag the camera from Unlinked to Linked.
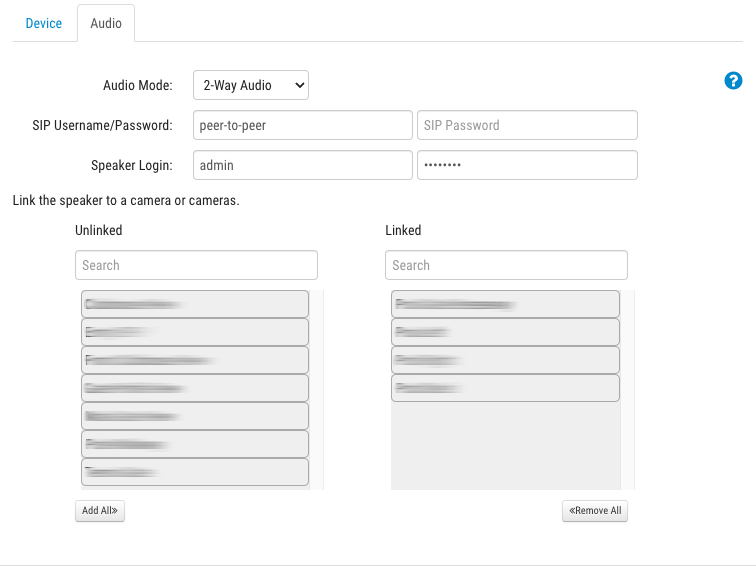

The Speaker Login field will not show in the dashboard for cameras with a built-in speaker.


For support please email: support@een.com
or give us a call at: 512-473-0501
US: +1-512-473-0501
EU: 31 (0) 20 26 10 461
ASIA PACIFIC: +81-(3)-6869-5477
#1 In Cloud Media Video Surveillance Worldwide
Copyright Eagle Eye Networks. All rights reserved.
Related Articles
EE AN072 Configure 2-Way Audio to Communicate Remotely Through the Eagle Eye Cloud VMS
EE AN072 Configure 2-Way Audio to Communicate Remotely Through the Eagle Eye Cloud VMS 2-Way Audio Click the banner to view the full Application Note. This Application Note is intended for both installers and administrators of Eagle Eye Cloud VMS who ...Eagle Eye VMS Camera Direct
Eagle Eye VMS Camera Direct 2025-03-27 Version 2.1 Description This guide describes how to add Camera Direct cameras to the Eagle Eye Cloud VMS. With Eagle Eye VMS Camera Direct, you can easily integrate your cameras with the Eagle Eye Cloud VMS ...Camera Direct FAQ
Camera Direct FAQ 2025-01-23 Version 2.1 Overview Eagle Eye Camera Direct is a simple solution that provides system flexibility and is ideal for businesses with multiple locations requiring only a few cameras at each location. Deploy Camera Direct ...EE AN031 Two Factor Authentication
Eagle Eye Application Note – AN031 Implementing Two-Factor Authentication Implementing Two-Factor Authentication Click the banner to view the full Application Note. This Application Note is intended for end users of the Eagle Eye Cloud VMS. ...Axis Camera Configuration Guide
Axis Camera Configuration 2025-09-03 Version 2.4 Description To set up the camera to stream to the Eagle Eye cloud, you must set up ONVIF and configure a couple of network-related settings. This guide will explain all the necessary configuration ...