Mobotix/ MOVE Camera Configuration Guide
Mobotix/ Move Camera Configuration
2024-05-14
Version 2.0
To ensure your Mobotix camera integrates with the Eagle Eye System properly, the following configuration specifications need to be met.
Click Admin Menu.
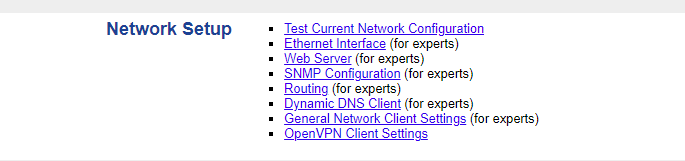
- Ethernet Interface: Change to a static IP or set dynamically as needed.
- Web Server: Disable HTTPS for ease of integration.
Click Integration Protocols in the Camera Administration section to configure the ONVIF settings.
Ensure the active Protocol is ONVIF.
Select Discoverable under ONVIF Settings.
Add a user with Admin access.
It’s best to match the camera login and ONVIF login for proper integration.
Click Set to confirm the configuration.
 The aspect ratio can be set to Free, however, special features (PTZ, Fisheye, Thermal, etc) only work with a fixed aspect ratio. If you don’t see the Fisheye / PTZ tab showing up in the camera settings on the Dashboard, set an aspect ratio here.
Ensure the camera’s firmware is up-to-date as per the Mobotix Website. You can check the current firmware version via the System Information menu under Hardware and Release Information.
MOVE cameras are not Mobotix in the classic sense as they are made by a different manufacturer. This makes them much simpler; you’ll find that they are very similar to most other IP cameras you work with.
Click Streaming.
2. Set the stream according to the following:
- Stream 1: Encode Type H.264, Framerate 12fps
- Stream 2 or 3: Encode Type MJPEG
Note: Some MOVE cameras do not allow the second stream to be set to MJPEG. In this case change stream 3 to MJPEG.
There are no special ONVIF settings that need to be changed.

For support please email: support@een.com
or give us a call at: 512-473-0501
US: +1-512-473-0501
EU: 31 (0) 20 26 10 461
ASIA PACIFIC: +81-(3)-6869-5477
#1 In Cloud Media Video Surveillance Worldwide
Copyright Eagle Eye Networks. All rights reserved.
Related Articles
EE AN054 Configuring Camera Models Supported by Eagle Eye Networks via ONVIF
EE AN054 Configuring Camera Models Supported by Eagle Eye Networks via ONVIF ONVIF Setup Click the banner to view the full Application Note. This Application Note is intended for Eagle Eye Cloud VMS account administrators who are responsible for the ...Axis Camera Configuration Guide
Axis Camera Configuration 2025-09-03 Version 2.4 Description To set up the camera to stream to the Eagle Eye cloud, you must set up ONVIF and configure a couple of network-related settings. This guide will explain all the necessary configuration ...Bosch Camera Configuration Guide
Bosch Camera Configuration 2025-09-26 Version 1.1 Description This guide will provide the necessary configuration needed for Bosch cameras to integrate with an Eagle Eye Networks system. Ensure to follow each configuration step for proper ...Hanwha/ Wisenet Camera Configuration
Hanwha/ Wisenet Camera Configuration 2026-03-25 Version 1.1 Description This camera brand does not require many settings changes to work with the Eagle Eye Networks bridge. There are a few caveats in regards to how the cameras can be connected ...2N Axis Camera Configuration
2N Axis Camera Configuration Guide 2024-05-20 Version 2.0 Description This guide will show you how to properly configure 2N Axis cameras to integrate properly with you Eagle Eye system. Models currently supported by Eagle Eye Networks: 2N Axis Base ...