ANV069 Brivo Eagle Eye Viewer Application for Windows
Application Note: Video - ANV069
Brivo Eagle Eye Viewer Application for Windows
2026-10-28 Revision 4.0 (Applies to Application version 5 and above)
This application note is for Brivo Eagle Eye Video users and administrators who run a Windows PC on the same local network as their Brivo Eagle Eye bridges or CMVRs, and who want to display camera video on one or more attached screens for security and operations use.
The Brivo Eagle Eye Viewer for Windows turns any PC-attached monitor or TV into a local video display. It shows live video from cameras on a Brivo Eagle Eye Video account, arranged in layouts, at full resolution, around the clock.
Its defining characteristic is that video travels over the local network. The application connects directly to each Brivo Eagle Eye Bridge or CMVR on the LAN using Brivo Eagle Eye QL Stream (RTSP) and decodes the video on the PC. Local video uses no internet bandwidth and doesn't depend on the internet being up. If the application can't reach a camera locally, it can fall back to streaming that camera from the Eagle Eye cloud instead.
The Brivo Eagle Eye Viewer app is available from the Microsoft App Store.
Version at time of APP NOTE: 5.0.34.0
Simply launch the Brivo Eagle Eye Viewer app, sign in with your Brivo Eagle Eye Video user credentials, select your layout, and you’re ready to go.
A brief list of features enabled by this application:
Select from your user's existing VMS layouts and display them uninterrupted for 24/7 local monitoring
Layouts will display up to 36 cameras (in a 6x6 grid)
Two simultaneous layouts can be viewed with dual-monitor support
Auto-rotate camera layouts
Create or edit existing layouts without affecting the VMS layout settings
Review the recorded video through the Brivo Eagle Eye Video VMS page in the app
Cloud Managed Video Recorder (CMVR) users with local video recording can download video directly to their Windows PC (requires CMVR bridge firmware 3.22.1 or later)
Live view and playback snapshots can be saved directly from the camera view
Supports local PTZ Control, Audio, and Dewarped Fisheye view.
Supports local PTZ control, motorized-zoom lenses, digital zoom, audio, and dewarped fisheye viewports
Account and permissions:
A Brivo Eagle Eye Video end-user account. The application does not work at the reseller account level; the signed-in user must belong to the end-user account that owns the cameras.
The user needs access to the cameras to be displayed and the ability to use or create layouts.
Creating a dedicated user for each display PC is recommended. Give it access only to the local devices and layouts that PC needs. A user with access to dozens of layouts across many sites makes the application load and hold data it will never show.
A PC that has no VMS user at all can still run the application — see Getting Started section 2, Manual Setup for Local-only mode.
Bridge and CMVR:
Brivo Eagle Eye QL Stream (RTSP) must be enabled in the VMS Webapp on each bridge or CMVR whose cameras will be displayed in full quality locally: Bridge Settings › Local Streaming › Enable QL Stream. (User must have bridge settings permission)
Stream authentication is enabled by default. The application works either way. If a site has several bridges, configure them all the same way.
If the signed-in user has Bridge Settings permission, the application enables QL Stream itself at sign-in.
See AN059, Using Brivo Eagle Eye QL Stream for Enhanced Local Video Viewing Solutions.
For bulk download, the bridge or CMVR must be reachable on the LAN and must hold local recordings. Bulk download reads the device's own recording, subject to that device's retention — it is not a download of the cloud archive.
Supported Windows:
Recommended: Windows 11, 64-bit (x64), on the latest feature update, with current graphics drivers.
About Windows 10. Nothing in the application needs Windows 11, and the Microsoft Store installs the components it depends on. A Windows 10 PC gets the same application and the same features; Windows itself draws the window with square corners and without Windows 11 snap layouts. The Microsoft Edge WebView2 Runtime must be present — it arrives with current Edge and Windows Update on almost every Windows 10 PC, but on a locked-down image without it there is no sign-in page and no camera grid until it is installed.
The application also needs the Microsoft Edge WebView2 Runtime, the Windows App Runtime 2.2, and the Visual C++ runtime libraries. All three are included in Windows 11 or installed with the application from the Microsoft Store.
Recommended PC Specifications:
A discrete graphics card raises the full-resolution budget and enables smooth video scaling. Wi-Fi can work but is not supported. Three or more screens are not offered.
Performance and Hardware:
How the application adapts by itself:
At launch, it detects which graphics adapter is actually being used for video and sets the amount of full-resolution local video it will carry accordingly:
Integrated graphics — Intel integrated graphics and comparable parts. This is the supported floor.
Discrete GPU — NVIDIA or AMD with 2 GB or more dedicated memory, or Intel Arc. The highest budget, and the only tier where smooth video scaling is available.
Software — a virtual machine, a remote desktop session, the Microsoft Basic Render Driver, a broken driver, or any PC with no hardware H.264 decode. A degraded mode. The application shows a Limited mode bar at the bottom of the window and carries considerably less video.
While running, the application watches whether the PC is keeping up. If decoding becomes slow, it rebuilds the streams once; if the problem persists, it moves that window to software limits and shows the Limited mode bar. If tiles are dropping frames, it reduces the amount of local video and moves the last cameras to the bridge preview stream. Restarting the application re-initializes the graphics hardware.
The budget is a ceiling, not a promise. The application may still shed load on a PC that cannot keep up for another reason — memory, CPU contention from other software, or slow bridges.
The budget is counted in megapixels of local full-resolution video connected at once, across every screen, including rotation members that are off-screen. Cloud tiles and preview tiles count zero. This is why a published limit is always cameras × resolution × screens, never a bare camera count: sixteen 1080p cameras and nine 4K cameras are very different loads.
Bandwidth:
Local video uses LAN bandwidth only, with no internet bandwidth. Measured:
A 2 MP (1080p) H.264 camera: about 2 Mbps
Sixteen 4 MP cameras: about 92 Mbps
A preview tile: about 0.2 Mbps
A useful planning figure for capacity is 2 Mbps per megapixel per camera main feed; this is what the application's own Test speed check uses to decide whether a link is adequate.
Installation and Deployment:
Install from the Microsoft Store: https://apps.microsoft.com/detail/9n405hkwbklj
If your organization restricts Store access, deploy through Microsoft Intune (Company Portal). Intune sources the application from the Store on the back end and pushes it to managed devices; end users do not need Store access themselves. Search the Store inventory in the Intune or Endpoint Manager console for the application by name.
If your organization uses Windows Defender Application Control (WDAC), you may need additional configuration. The resolution is at your IT administrator's discretion.
Preparing a PC for 24/7 display use:
Use a dedicated PC. The application is optimized for a machine whose job is to display cameras. Using the same PC for daily work while a wall is running will limit both.
Stop the PC from sleeping. Disable sleep, screen savers, and any setting that turns the display off after inactivity.
On Windows 10 or 11 Pro, kiosk mode is the cleanest way to run an uninterrupted display: it prevents users from reaching any other application or the operating system.
Turn on Quick Start (Settings › General) so the PC returns to its wall quickly after a restart without waiting on a sign-in. On a PC with no VMS user, use local-only mode instead (Getting Started section).
A screen with rotation enabled opens its window automatically when the application starts, so a wall returns after a restart without anyone touching it.
Network:
Creating a network with a high-bandwidth video surveillance system that doesn't negatively impact other users on the same LAN requires careful planning and network management. If you have a complex or large-scale video surveillance system, consider consulting with network and security experts who specialize in these installations.
EX. Segmented Star Topology: Shared Viewing Switch with Isolated LAN UplinksWe recommend a dedicated network consisting of Gigabit-speed switches for all devices.
Bridge Network Port and Local Streaming
The Brivo Eagle Eye Viewer application streams local video by connecting to each bridge's QL Stream (RTSP) service over your local network. The port on the bridge your PC connects to determines which cameras are available as local streams.
We recommend connecting the PC to the same network as the bridge's WAN port — the port the bridge uses to communicate with Brivo. In this configuration, all bridges and CMVRs on that network can deliver local RTSP streams to the application simultaneously.
If the PC is connected to a bridge's CamLAN port instead, only cameras on that specific bridge will stream locally. Any other bridges at the same site will deliver video over cloud HTTPS, which may result in lower resolution, higher latency, and increased internet bandwidth usage compared to local streaming.
VLAN and Firewall:
VLAN Responsibility
The Application requires unhindered Layer 2 or Layer 3 direct IP connectivity between the Brivo Bridge or CMVRs and the target client PC on the same local broadcast domain (or explicit routable paths).
If the customer chooses to deploy the application and target devices across separate Virtual Local Area Networks (VLANs), the customer’s internal network administrator is solely responsible for configuring:
Inter-VLAN routing (Layer 3 gateway rules)
Firewall, Access Control Lists (ACLs), or port-forwarding policies permitting required application ports
Multicast/mDNS/broadcast forwarding if the application relies on local device discovery
ICMP must be allowed
The application decides whether a bridge is reachable by pinging it once a minute. A device is treated as failed only after three missed pings.
A network or firewall that blocks ICMP makes every bridge appear unreachable, even when RTSP works perfectly. Every tile will show Unreachable device. This is the single most common network-level cause of a blank wall.
LAN Ports
TCP 8554 open to the bridges
TCP 8888 open if bulk download is needed
UDP 3702 and the ONVIF TCP ports open to the cameras if PTZ is needed.
Windows PC Best Practices for CamLAN-Connected Devices:
When using Brivo Eagle Eye Viewer on a PC connected exclusively to a bridge's CamLAN port, the PC will have no general internet access. All Brivo endpoints are accessible through the bridge. To minimize Windows interruptions during unattended 24/7 operation, we recommend the following before deploying the PC to the CamLAN.
Disable Wi-Fi: If the PC has a wireless adapter, disable it while connected to CamLAN. Windows may attempt to route traffic through any available interface, which can cause unexpected behavior. Use a single wired connection only.
Disable startup applications: Applications like Microsoft Teams, OneDrive, and browser startup accelerators will attempt to connect to the internet on launch and may generate notification popups when they cannot. Disable any startup applications that are not required for this deployment via Task Manager → Startup.
Time synchronization: The bridge provides NTP service on the CamLAN network, so the PC clock will remain synchronized automatically when using DHCP. If the PC is configured with a static IP, point the Windows time service at the bridge's CamLAN IP address (default: 10.143.0.1) to ensure accurate timestamps.
Windows Update: Without general internet access, Windows Update cannot download or install updates. Automatic updates can be disabled. Pending update notifications are safe to dismiss. If the PC is periodically connected to the internet for maintenance, allow any active updates to complete before returning to CamLAN-only operation.
Brivo Eagle Eye Video:
This application is not intended to replace Brivo Eagle Eye Video Web App. However, you can use it on-premises to access additional functionality for locally associated Bridges/CMVRs and camera streams.
Windows Login Flow:
Download the application to your device from the Windows App Store.
Ensure your PC's IP address is on the same network/subnet as the local Brivo Eagle Eye Networks Bridges or CMVRs.
For deployments with multiple bridges or CMVRs, ensure the PC is connected to the same network as the bridge WAN ports.
See the Network section in the Usage Guidelines for details on how your PC's network connection affects local streaming availability across multiple bridges.
The first time the application is opened, it will load to the Brivo Eagle Eye Video user authentication page.
Enter the VMS username and password for the user.
Must be a user in the account containing the needed cameras
The application will check the network and proceed to load the user's layouts
The main window. The sidebar navigation on the left lists the layouts, each with a health dot and its camera count; the open layout fills the rest of the window.
Manual Setup Option (Optional Local Live Only setup):
The application has an option to import QL Stream URLs (Bridge RTSP), which does not require a user to log in to Brivo Eagle Eye Video via the login flow discussed above.
This may allow more dedicated, simpler “spot monitor” deployments without creating a special user in the account, with layouts created solely for local display.
This option supports locally available devices only, and provides only the option to Live View the camera streams (Camera History, remote camera streams, and video downloading are only available with a user login). Only QL Stream settings and the network topology matter when using this method.
Download the application to your device from the Windows App Store.
Ensure your PC's IP address is on the same network/subnet as the local Brivo Eagle Eye Networks Bridges or CMVRs.
For deployments with multiple bridges or CMVRs, ensure the PC is connected to the same network as the bridge WAN ports.
See the Network section in the Usage Guidelines for details on how your PC's network connection affects local streaming availability across multiple bridges.
Getting started:
To import the cameras to the application, an Admin-level account user needs to use the “Reports” feature of the VMS account, to run a “QL Stream (RTSP) URL List” report.
From the left-hand menu, find Files > Reports.
Use the “+” icon in My reports, to create a report, and search for “QL Stream (RTSP) URL List” report template:
The report does not need to be “scheduled” (it is only needed on demand)
Use the Bridges drop-down menu to select bridges that will be local to the PC where the streams are needed.
NOTE: Reseller users should not do this, as the report will provide incorrect information; the user must belong to the account for which the report is needed.
Before running, ensure that QL Stream (RTSP) is enabled for the Bridge (s) by navigating to Bridge Settings > Local Streaming and selecting the Enable button.
Stream auth is enabled by default, but is not required. If multiple bridges are needed, it is best practice to have them all use the same settings.
Once the report has been uploaded, it will appear in the “Report results” section. Select the CSV file to download the report.
Store it on a thumb drive or similar if it will be handed off to upload to the PC.
Open the Eagle Eye Viewer Application on the PC. Do not use the user login option; look to the bottom of the app window and select “Use cameras from a CSV file” instead:
This will open your Windows File Explorer, and allow you to navigate to the CSV report that was downloaded, and click the file to import it:
The app will begin uploading the CSV and scanning the network for the bridges.
When it is done, the application creates one layout per bridge, named after it; a bridge with more than 16 cameras is split into "Bridge (1)", "Bridge (2)", and so on.
Re-importing a newer export keeps reordered copies, the last layout, and the rotation.
After setup, the application stores camera URLs in memory, so you can close and reopen it as needed, and the camera streams will reconnect.
If any network changes are made that would affect the IP address of the Bridge/s, the cameras may become unavailable to the application. In this case, either restore the Bridge IP to what it was at the time of the CSV import, or reset the application and import a new CSV report to the device.
Static network address settings can reduce the likelihood of this occurring.
Many cloud-dependent options will be disabled in this method, as the integration is designed to stream local video to the screen for local display.
How a camera's video reaches the screen
The application chooses one of 3 paths per camera when a layout is built.
When the local network works, local video always wins.
Layouts:
The user layouts created from the account load into the Layouts section after login.
The Filter can be used to sort and find layouts.
Account layouts come from the Brivo Eagle Eye Video account.
Local layouts are created on the PC and stay there; up to 16 can be kept.
Use “New layout +” to create a layout, or right-click a layout and select Edit layout to edit an Account layout.
A layout holds up to 36 cameras.
Up to 16 play at full resolution; a layout of 17 to 36 cameras shows the bridge preview stream on every tile, with full resolution on maximize.
An account layout carries no geometry of its own, so the application computes a grid from the camera count:
1 camera fills the window
2–4 use 2×2
5–6 a 3×3 with an enlarged first tile
7–9 a 3×3
10–13 a 4×4 with an enlarged first tile
14–16 a 4×4.
The last layout used reopens at launch unless all of its cameras are unreachable.
The layout editor (Ctrl+Shift+I for a new layout, Ctrl+E to edit the open one) offers grid sizes from 2×2 to 6×6, cameras assigned per cell, and large "hero" tiles of 2×2 or more made by joining cells.
Settings › Layouts sets the order, hides layouts that are not needed and brings them back, and lists the layouts held on this PC.
Layout. Pick New local layout, or a layout to edit—layouts hidden from the list show [hidden].
Name. For example, Lobby + Entrances.
Grid. Choose the size of the grid, from 2 × 2 up to 6 × 6.
The grid. Click a cell to select it, then tick a camera in Available cameras to put it there. Cameras fill the cells in numbered order.
Large tiles. Click two small cells to make one large square tile (at least 2 × 2). Drag a large tile to move it, or choose its ✕ to remove it. Drag a small tile to move its camera.
Assigned cameras. The cameras in tile order. Up, Down, and Remove change the order or remove one.
Available cameras. Search the list and tick the cameras you want.
Save layout. A layout needs a name and at least one camera.
Editing a layout from your account makes a local copy on this PC and hides the original; the original is not changed. Deleting the copy shows the original again. Delete removes a local layout; Hide from list and Show in list hide and unhide one; and Restore layouts to VMS defaults deletes every layout on this PC and shows every hidden one.
You can keep up to 16 layouts on this PC. A layout can show up to 36 cameras.
In the Sidebar, each layout shows a dot and its camera count: green if every camera can be reached, yellow if some cannot, red if none can. A red layout is dimmed and will not open — unless cloud streaming can serve it, in which case it offers Use cloud streaming.
Wall mode:
F11 (right-click “Toggle full screen” & “Hide sidebar”) fills the screen with the camera grid.
After a few seconds without input, the navigation and title bar hide themselves; moving the mouse brings them back, and a one-off hint says so.
Esc leaves full screen.
The Sidebar is the menu on the left side of the screen. Beyond choosing layouts, it also offers other quick-access items.
Displays:
Displays in the sidebar (or at Settings > Displays & rotation) lists the screens attached to the PC. The “open window on this display” opens an independent full-screen window on that screen, with its own layout list and its own rotation.
A layout can also be sent to a screen by right-clicking it and choosing Show on display.
Each window plays independently of the others.
Up to two displays are supported.
Layout Rotation:
Select the display (This display is the main window) in Settings › Displays & rotation.
Turn on Enable layout rotation.
Set “Switch every” to 30 seconds, or 1 to 5 minutes.
Add at least two layouts, order them, and save changes.
Points that matter in practice:
Only layouts of 16 cameras or fewer can rotate.
Every camera in every rotating layout is connected and decoding at all times, including the layouts that are off-screen. That is what makes a switch instant with no "connecting" delay — and it means the cost of a rotation is the whole set, continuously, not just the layout on screen. Cloud-streamed cameras are the exception: they stream only while on screen.
Each display's rotation draws on a shared local video budget, shown as a total such as "14MP of 72MP used". A camera that rotates on two displays counts twice. Cloud and preview tiles count zero. The budget is checked when the rotation is saved, and the application will say so if a rotation would exceed it.
Maximizing a camera pauses the rotation; restoring the tile resumes it.
Opening a layout by hand turns rotation off for that display until it is re-enabled.
A display with rotation enabled opens its window automatically when the application starts.
Downloads:
Bulk download copies recorded clips directly from CMVRs over the LAN to this PC. These are the device's own local recordings, subject to that device's retention — not the cloud archive. Open it from Downloads in the navigation, or Ctrl+Shift+A.
Choose the From and To dates.
Bulk downloads will offload all video for each day selected, which includes all recordings for the selected cameras. Some cameras may not have recordings for all selected days; the system does not indicate whether recordings exist for all selected cameras for any selected date range, but if none are found, it will report this.
Choose the destination folder. It is remembered, and can also be set in Settings › Downloads.
Choose a format:
Raw (FLV) — the video exactly as the bridge stores it. Fastest, but FLV has limited playback support in common media players.
MP4 — repackaged without re-encoding. Fast, and plays anywhere.
MP4 with timestamps — re-encoded with the UTC time burned into the picture. Useful for evidence; the conversion can take longer than the download itself.
Tick the bridges and cameras to select.
A device this PC cannot reach is marked (unreachable).
Bridges do not hold local recording, but may have local video that has not been transmitted to the cloud yet; this may download, but it is not guaranteed.
ONLY CMVRs hold local video on site, based on the camera settings.
Estimate counts the clips, works out the space they need, and reports the free space available. It also times a short read from each bridge to estimate the download; CMVRs download in parallel, so the slowest one sets the time. The estimate does not include conversion time.
Start. If no estimate has been run, the application estimates first and asks for confirmation with the size, the time, and the free space. If the download may not fit, it says Not enough free space and offers Start anyway. Stop ends the download after the current file.
Operational notes
Clips already present in the folder, as FLV or MP4, are not downloaded again.
In the MP4 modes, the FLV is deleted only after its MP4 has been made and verified, so only the MP4 remains. If a conversion fails, the FLV is kept on purpose.
A download stops if the drive runs low on space and reports it.
A camera is skipped, with the reason shown, when it has no local address (a cloud-only camera), when its device is unreachable, or when its clip list could not be read.
Conversion continues in the background after the window is closed.
Recorded video is large. For example, twelve 3 MP cameras recording about twelve hours a day can produce about 100 GB per day. Check the estimate and the free space before starting a multi-day download.
Map:
The Map function can use location data from your camera settings in your Cloud VMS account to place the camera at its physical location on the integrated world map. The cameras display a dot on the map indicating their location, and you can select a dot to view the current live feed. There is also a filter to find cameras, and an option to save local location data.
Collapse navigation:
This option minimizes the sidebar menu to icons.
The Top bar, when the app is not in full-screen Wall mode, also hosts some quick action items.
Layout Picker:
A secondary option to select the layout for display is useful when the Collapse navigation option is selected.
Camera or layout finder:
Use the search bar at the top of the screen to quickly find cameras or layouts. Use Ctrl+K for quick access.
Secondary display:
If a secondary display is recognized when the application is started, the display is shown as a quick access item to Display settings.
Account button:
Choose the account button (your initials).
The menu shows who is signed in and has:
Refresh (Ctrl+R): After you confirm, clear the saved data on this PC and load your account, cameras, and layouts again. Use it after changes made elsewhere, such as a camera added in the Eagle Eye Video web app, or when a camera that has come back online still shows as offline.
Keyboard shortcuts (F1): a popup with all keyboard shortcuts listed.
About app: the version of the app, your system, and the licenses of the software it includes.
Logout (Ctrl+Q): log out the user and set the app back to default settings.
Exit (Alt+F4): close app without signing out
In local-only mode, the menu has no name card, and Refresh and Logout become Import camera CSV… and Leave local-only mode.
Settings:
Choose Settings (gear icon) in the Sidebar—the tabs along the top group the settings.
Back — the arrow beside the title— returns to the cameras.
Most settings apply the moment you change them. Only Displays & rotation has Save changes and Cancel.
General:
Quick start: skips the sign-in page and the data fetch on subsequent launches and uses the data cached from the last successful sign-in. It is intended for an unattended display PC that must return to its wall quickly.
While Quick start is in effect:
Cloud streaming can become unavailable because there is no live access token.
Camera online/offline status is whatever it was when the cache was saved.
Some camera settings may be missing, so a resolution may show as "–".
A full sign-in resumes at any time with Refresh (Ctrl+R).
Show in the sidebar: switches for Displays, Downloads, and Map to hide the ones you don't use. Displays is also a tab here in Settings, and bulk download still opens with Ctrl+Shift+A when its entry is hidden.
Layouts:
Order: select a layout and move it up or down. A layout added later joins the end of the list.
Hidden VMS layouts: account layouts you hid, including ones replaced by a copy on this PC. Show brings one back; it does not delete the copy.
Layouts on this PC: the layouts you made or copied here. Delete removes one.
Restore layouts to VMS defaults: Deletes all created and edited layouts, setting back to account default.
Video & streaming:
Allow Cloud Access: is on by default. It allows a camera whose bridge cannot be reached from this PC to be streamed from the Eagle Eye cloud instead.
With it off, a camera that cannot be reached locally offers Use cloud stream on its tile, and a layout whose cameras are all unreachable offers Use cloud streaming in the navigation.Cloud viewing is a fallback, not a substitute. Expect about 1 frame per second in the grid, visible latency compared to local video, and internet bandwidth use.
Maximized camera (full video) cloud viewing ends after 30 minutes, and the tile returns to the preview picture.
Smooth video scaling: reduces shimmer on small tiles. It needs a dedicated graphics card and uses more of the processor; on a PC without one, it stays off.
Camera tiles:
Tile overlay layout. Drag the camera name, the time, and the buttons to any corner of the sample tile. The change applies to every camera at once.
Show camera name and show camera time.
24-hour clock shows 13:05 instead of 1:05 pm, and Show milliseconds adds milliseconds to the time.
Fill tiles (crop video to fit). On: each picture is cropped to fill its tile. Off: you see the whole picture with bars where it does not fit.
Every cell is 16:9, so a grid that does not divide evenly based on camera resolution or format leaves blank space at the bottom or right — that is not a fault.
Tile controls: when the buttons show on a tile — Always, On hover, or Never.
Return lenses to their starting position offers Off, 5, 10, and 30 minutes. Off is the default. The setting is hidden from users without the PTZ control permission and in local-only mode.
A camera moved from the pad — by arrows, a preset, or Home — returns after the chosen quiet period.
Starting a tour cancels the return.
A fresh press always takes priority over a pending return.
The return is abandoned if the camera has moved since the application last left it, assuming someone else is now using it.
Zoom-only lenses never return. A varifocal camera cannot report or restore its zoom position, so there is nothing to go back to. The setting does not affect them.
Camera Tiles and Actions:
Each tile can show the camera name, the time, and buttons for History, Snapshot, Audio, and PTZ.
Maximize. Click a playing tile to fill the window; click again or press Esc to restore. On layouts with more than 16 cameras, maximizing switches that tile from the preview stream to full resolution. A running rotation pauses while a tile is maximized. Maximizing is also how you access the zoom, lens, and fisheye controls.
Snapshot. Saves a PNG to the Windows Downloads folder. A fisheye camera saves both the dewarped view and the original picture.
Audio. A speaker button appears only when the camera's settings have a microphone enabled and an audio track has arrived. It starts muted, applies to one tile at a time, and is not remembered. It is listen-only: there is no talk-down or two-way audio. Audio is not available on cloud or preview tiles, or during rotation.
History. Opens the camera's recorded video in the Brivo Eagle Eye Video web app, in its own window. Needs user login and is a regular session to VMS with user permissions.
Preview. Right-click a tile streaming from a bridge and tick Preview to switch it to the light stream; untick to return. The choice lasts until the application closes.
Rearranging. Drag a tile onto another to swap them. The new order is saved. An account layout is never changed: the application saves the order as a copy on this PC and tells you so.
Downloads:
Destination folder for bulk download (Browse…)
The folder cannot be changed while a bulk download is running.
Open Bulk Download.
Camera Zoom, Lens Control and Fisheye:
Digital Zoom:
Every camera can be magnified on screen (excluding Fisheye cameras), and some cameras can be moved or zoomed in real time. These are separate things, and they behave differently.
Digital zoom magnifies the picture the application already has. It changes nothing on the camera; it is available on any standard camera stream, and it never affects what is recorded.
Maximize a tile, then turn the mouse wheel to zoom around the pointer. Each notch is 1.25x, up to 8x. Drag the picture to pan while zoomed.
The zoom factor appears at the top of the tile with Save and Reset beside it. The group is shown only while the tile is zoomed or has a zoom saved.
Save keeps the zoom for that camera in that layout. A saved zoom is then applied everywhere that camera appears in the layout, in the grid as well as maximized, and it survives a restart.
A plain click on a zoomed tile restores the grid and discards an unsaved zoom. Save first.
A snapshot captures the zoomed view, not the full picture. Reset before taking a snapshot of the whole scene.
Digital zoom is stored on the PC for each layout. It is not shared with the account, and it does not appear in the Brivo Eagle Eye Video web app. Cloud and preview tiles can be zoomed while you watch but cannot save a zoom; a tile streaming locally at full resolution can. Fisheye tiles have their own controls and aren't digitally zoomed.
Because a saved zoom is held against the shape of the tile, it shifts slightly if the grid changes shape — the sidebar opening, the window resizing, or switching between Fill and fit. The effect grows with the zoom factor. With Smooth video scaling on, 8x looks soft.
Lens Control: PTZ and Motorized Zoom:
A camera that can physically move or change its own zoom shows a control pad on a maximized tile.
PTZ cameras get direction arrows, zoom buttons, and the preset, home, and tour controls.
Varifocal cameras — a motorized zoom lens with no pan or tilt — get a zoom-only pad. They have no arrows, no presets, and no tour.
Press and hold a control to move; release to stop. A fifteen-second watchdog stops the camera if you lose a release.
The pad appears on every window that shows cameras, including external displays. Closing a window stops any movement it started.
The PTZ control permission is required. The pad, the cloud marker, and the camera sign-in prompt appear only for users whose Brivo Eagle Eye Video account has PTZ control permission. Without it, there is no pad on any window, and the application does not even look for cameras on the network. This is stricter than the Brivo Eagle Eye Video web app, which still allows that user to zoom, and it is deliberate: an unattended display PC should not offer lens control to a restricted viewing user. If a PTZ camera shows no pad, check the permission first, then refresh.
Two routes to the camera. Where the camera is reachable on the PC’s own network, the application controls it directly over ONVIF. Where it is not, control goes through Brivo Eagle Eye Video instead, and the pad carries a small cloud marker reading Controlled through the cloud. A camera controlled this way has no tour. The cloud route depends on the account’s internet connection and is not available in local-only mode.
Discovery. The application finds cameras by asking the network (UDP 3702) and by probing each known camera address directly on TCP 80, 2020, 8080, 8899, 8999, and 10080. A VPN or Wi-Fi client isolation commonly blocks the first of these; the direct probes usually still succeed. A wired connection on the camera’s own network is the reliable arrangement.
A camera controlled over ONVIF is driven with the camera’s own username and password, not the Brivo Eagle Eye Video login. Where the bridge’s stored credentials are refused, the application asks once and remembers the answer.
The application compensates for a camera with the wrong clock, which otherwise presents as a rejected password. A camera that keeps asking for credentials after they have been entered correctly is usually refusing them for another reason — check the account on the camera itself.
Presets, home and tour come from the camera over ONVIF for manually added cameras, and from the Brivo Eagle Eye Video PTZ settings for bridge-managed cameras, which need no ONVIF sign-in. Some camera firmware refuses a Home command while accepting the equivalent preset.
A PTZ camera an operator has moved can return on its own, so an unattended wall does not stay pointing wherever it was last left.
Settings › Camera tiles › Return lenses to their starting position offers Off, 5, 10, and 30 minutes. Off is the default. The setting is hidden from users without the PTZ control permission and in local-only mode. Zoom-only lenses never return. A varifocal camera cannot report or restore its zoom position, so there is nothing to go back to.
Fisheye Cameras:
Maximize a fisheye tile to reach its controls (2):
(1) Mode — Raw shows the circular image as the camera sends it. Wall straightens it for a camera mounted on a wall. Floor/Ceiling straightens it for a camera pointing straight up or down. Drag the picture to look around.
(3) Calibration opens the sliders: Offset X, Offset Y, Scale X, and Scale Y align the application’s model to the circle of the lens, while Zoom and Rotate adjust the resulting view.
(4) Reset returns them to their defaults. The figures beside Reset are the mounting height and the field of view.
Settings are remembered for each camera. A snapshot of a straightened view saves both the straightened image and the original circular one.
Limits. Only the equidistant lens curve is straightened. A camera using any other curve shows its raw circular image, and no calibration will correct it. Fisheye cameras are not offered a PTZ pad — they use the straightening controls instead — and they are not digitally zoomed.
Saved views from the account. Where a layout pane has been set in the Brivo Eagle Eye Video web app to a saved fisheye viewport, the application renders that pane exactly as the web app does, and the straightening controls above do not apply to it. Both arrangements are supported, and a layout may mix them.
History:
The clock button on a camera tile opens that camera's recorded video on the Brivo Eagle Eye Video web app history page, in a window of its own. Each camera opens its own window.
What it plays. History shows the recording held in the Brivo Eagle Eye Video cloud archive, not the recording held on the local bridge (local CMVR video is requested through the cloud as normal for local recording accounts). To retrieve a device's own local recordings, use Bulk download instead.
Signing in. The history window is a normal Brivo Eagle Eye Video web session and needs its own sign-in, separate from the application. It can be any user on the account with permission to view recorded video — it does not have to be the user the application is signed in as. This allows a display PC to run under a restricted viewing user while an operator opens history under their own credentials.
Once signed in, the session stays active for as long as the account's own session timeout allows. When it expires, the next history window asks for sign-in again.
The window is restricted to Brivo Eagle Eye Video. It will not navigate to the wider internet: only Brivo Eagle Eye Video pages load. This is deliberate. The application is frequently deployed on unattended or public display PCs — kiosks, lobbies, guard positions — where the owner has deliberately removed access to a general browser. Opening a camera's history on such a PC must not hand a passer-by a way out onto the internet.
When it is not available:
On a PC with no general internet access. History is served from the Brivo Eagle Eye Video cloud and cannot be reached.
In local-only mode. The application has no account session, so the button is hidden rather than left to fail.
In both cases, use the Brivo Eagle Eye Video web app from another machine, or Bulk download to retrieve the device's own recordings.
What a tile is telling you:
Red means the system believes the camera is down. Amber means the camera should be working, but no video is arriving.
Three failure patterns worth knowing:
Another client is holding the camera. A bridge's RTSP server shares one stream per camera among all of its viewers. A client that connects and then stops reading blocks that camera for every other viewer — and the bridge only drops it at its own TCP timeout, roughly fifteen minutes later. That client can be another application, a crashed process, or a half-open connection elsewhere on the network. "RTSP answers but no frames arrive" has repeatedly turned out to be another client on the bridge. When a single camera is stubbornly amber, and everything else looks correct, look for other RTSP consumers before suspecting the bridge or the camera.
One camera drifts behind live. If a single camera plays but falls further and further behind the others — seconds per minute — the camera or its bridge is sending fewer pictures than its timestamps claim. The application plays frames as they arrive, so the drift accumulates. This isn't an application fault: check the camera's frame rate, its slow-shutter and low-light settings, its bitrate cap, and the link between the camera and the bridge. Pulling the same camera with another RTSP client confirms it.
Everything on one bridge stalls together. Usually, the bridge pauses and recovers on its own within seconds. If it repeats, check that bridge's load and its network.
First steps for any problem
Refresh (Ctrl+R) — fixes anything caused by stale account data: missing layouts, cameras stuck offline, cloud addresses that have expired.
Check the network path. Is the PC on the same subnet as the bridges' WAN ports? Is ICMP allowed? Is a VPN active?
Check that QL Stream is still enabled in Bridge Settings. Disabling and re-enabling it, saving each time and waiting a few minutes in between, restarts the service on the bridge. Follow with a Refresh.
Open the log (Ctrl+D) and look at what the application reports.
Contact support.
Contact support:
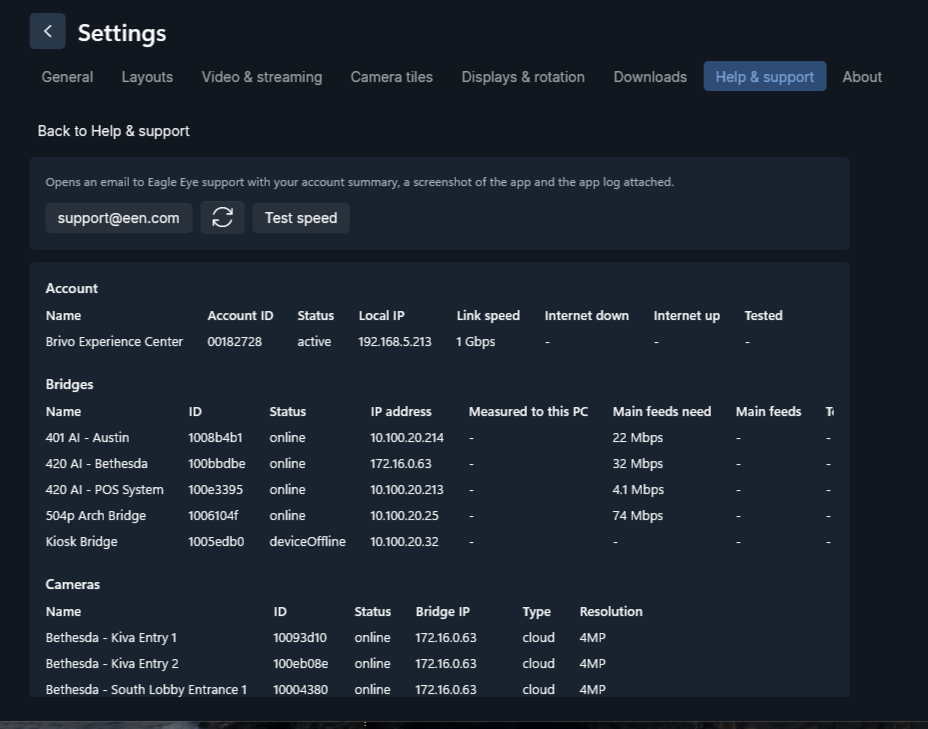
Settings › Help & support › Contact support shows the summary that goes to support — the account, every bridge and every camera with its status, whether it is local or cloud, and the PC's own network address — and composes an email with the session log and a screenshot of the application attached.
Test speed measures the PC's internet speed (up and down) and reads a short recorded video from each bridge to measure its real speed. Under Main feeds, Too slow in red means a bridge cannot deliver every connected camera's full stream to this PC at once; a slow or shared link is the usual cause.
Contact support needs a configured mail client. If you don't have one, or don't have internet access, copy the information from that page and send it from another device.
The log:
Open log (Ctrl+D) opens a copy of the current session's log, as plain text, with a status summary of the account and devices at the top. It is safe to send: stream passwords are masked in the log.
The application writes one log file per launch, rolling over at midnight and at 10 MB, keeping today and yesterday. Logs are stored in the application package's own local data folder under
%LOCALAPPDATA%\Packages\ .
If the application closes without writing anything to its log, look in Windows Event Viewer › Windows Logs › Application for an "Application Error" event.
Reading the log:
The log is a running account of what the application did and what each camera's stream was doing at the time. Most support questions are answered by finding the few lines around the moment something went wrong. You do not need to read it end to end.
Every line has the same shape — the time, the severity, the component that reported it, and a message:
13:39:24.827 [INFO] HardwareTier: Discrete - WebView2 uses 'NVIDIA GeForce RTX 3060'
(vendor 0x10DE, 12115 MB dedicated).
Most lines are [INFO] and simply record what happened. Searching for [WARN] is the fastest way into a problem, because the application only raises a warning when something did not work. Most warnings also explain themselves in plain English, so in many cases the line you find is the whole answer.
Start at the top. The first dozen lines of every session record the version, the PC, and the decisions the application made because of it:
A new session begins each time the application starts, so if a user has restarted since the problem, check that you are reading the right session — search for Session started and work forward from the last one before the reported time.
Cameras appear by ID, not by name. This is the single most useful thing to know. Apart from the Capacity tile lines, the log identifies a camera by its eight-character ID:
So to investigate one camera, first get its ID. Help › App Meta Data lists every camera with its name, ID, bridge address, type, and resolution, and every bridge with its name, ID, D and address. Open that alongside the log and use it as the translation table in both directions — name to ID before searching, ID to name when reading a warning. It is worth asking a user to send both files together for this reason.
Then narrow the problem before reading further. The useful question is almost always how many things are affected:
Lines worth recognizing:
Reading a Capacity line. When one camera is misbehaving, its Capacity tile lines answer most of the question on their own. A healthy one looks like this:
Capacity tile 'Lobby - North Door': 8.1 fps | received=123 decoded=121 dropped=2 keyframes=3
| freezes=0 (0 ms) | delay=9 ms decode=1.3 ms/frame | lost=0 nack=0 pli=13
Read it in this order:
received against the expected frame rate. Well below it, with nothing lost, means the camera or its bridge is sending fewer pictures than it claims. That is a source-side problem, not an application one.
decoded against received. A gap here points at the PC rather than the camera — it is receiving the video but cannot decode it fast enough.
delay. A figure that climbs steadily from one report to the next means the picture is drifting further behind live.
freezes. The count and total duration of visible stalls, which is what the user actually noticed.
lost and nack. Anything other than zero means frames went missing on the network between the bridge and the PC.
What the log will not tell you. If the application closed without warning, the fault may never have reached the log at all; look in Windows Event Viewer › Windows Logs › Application for an "Application Error" entry instead. The log also records what the application saw, not what the network did: a bridge that is unreachable looks the same in the log whether it is switched off, on another VLAN, or behind a firewall blocking ping.
About:
Account menu › About app shows the application version, the Windows version, the CPU and graphics in use, the network and its link speed, and the licenses of the software included. Copy version information puts those details on the clipboard to paste into a message to support.