ANV028 Brivo Eagle Eye Video Embedded History Browser and Video Downloads
Application Note: Video - ANV028
Brivo Eagle Eye Video Embedded History Browser and Video Downloads
2024-06-28 Revision 1.0
This Application Note is intended for all end users of Brivo Eagle Eye Video. Anyone who needs to view historical video will benefit from knowing how to use the History Browser and will need to download video data files from Brivo Eagle Eye Video. No prior background knowledge is needed.
Brivo Eagle Eye Video provides on-demand access to recorded video through the History Browser. Accessing the History Browser for a camera provides access to the full recording history for the retention period, with events marked as color ranges in the Timeline to make searching easy. The History Browser provides multiple ways to access and recall historical video, and simplifies saving and managing video clips, creating downloadable video requests, and archiving video for case management. Video data can be both downloaded on the local machine and archived in the Brivo Eagle Eye Cloud for later retrieval. The History Browser is available in all Editions of the VMS (Standard, Professional, Enterprise).
Brivo Eagle Eye Video History Browser recalls video for historical review in two ways:
Full Cloud Application – Video is requested from the Eagle Eye Cloud Data Center and loaded in the player upon opening the History Browser. An additional video is requested and loaded from the cloud during quick scrubbing from the Timeline, Event Search, Calendar, or Time Stamp Selection. This video is displayed in the low-resolution preview stream until play is pressed. Pressing play initiates a request from the cloud for the full-resolution video stream.
Local Storage CMVR Application – Video is requested from the CMVR upon opening the History Browser. An additional video is requested and loaded from the CMVR during quick scrubbing from the Timeline, Event Search, Calendar, or Time Stamp Selection. This video is displayed in the low-resolution preview stream until play is pressed. Pressing play initiates a request from the CMVR for the full-resolution video stream.
Brivo Eagle Eye Video History Browser is accessed by selecting the History Browser icon in either of the two locations detailed below.
Table 1: History Browser icon selection and example image of the Preview Image Video Pane
Note that selecting the History Browser icon will open the feature in a new browser window.
Image 1: Example History Browser view
From the History Browser, users can access historical video for review and management. The History Browser functions include the following:
Video Timeline – Located at the bottom of the browser. Allows users to click and drag through preview video history. Time intervals are available for quickly scrubbing through long events and identifying activity over extended periods. Options include intervals of 1 minute, 10 minutes, 2 hours, or 8 hours. See the Video Timeline Color Key below for a better understanding of what each color within the Video Timeline indicates.
Video Playback Controls – Located at the bottom-center below the Timeline. Allows users to play, pause, advance, and reverse full video playback.
Video Playback Variable Speed Controls – Located to the left of Playback Controls. Allows users to select playback speeds: 0.5x, 2x, 4x, or 8x.
Video Clip Creator – Users can hold Shift and click to select start and stop points of an event block to create custom clip durations.
Video Timeline Event Blocks – Blue and light blue areas highlighted on the Timeline. Blue indicates full video recordings, while light blue indicates that Motion Events were detected, activating the full video recording.
Full Video Frame Snapshot – The Snapshot icon is located at the bottom of the browser window. This allows users to save a full-resolution snapshot of the current video frame to the Archive folder “Snapshots” with a single click.
Clip Link Copy – The Clipboard icon is located at the bottom-right corner of the browser window. This allows users to auto-save a secure link of the selected timestamp or customized clip to their workstation clipboard for copy/paste functionality.
Export – The Export icon is located at the bottom-right corner of the browser window. This allows users to request that a clip at the current timestamp be made available in the Downloads section of the Navigation panel in the main user interface.
Under the Files Tab on the left-hand side of the VMS, you will find two subcategories, Files and Archive.
Archive — this feature in Brivo’s cloud storage allows you to save video clips outside of the default retention system and share them via a link to anyone. The Downloads tab is used to download videos and view clip details.
Downloads Tab
You can download a video to your computer as a standard MP4 file or as a ZIP file containing multiple MP4 files. Click the Export’ button (which is a circle with a down arrow) to see the video download dialogue. It’s located at the bottom right. You will see the export menu, which lets you edit all the clip's parameters.
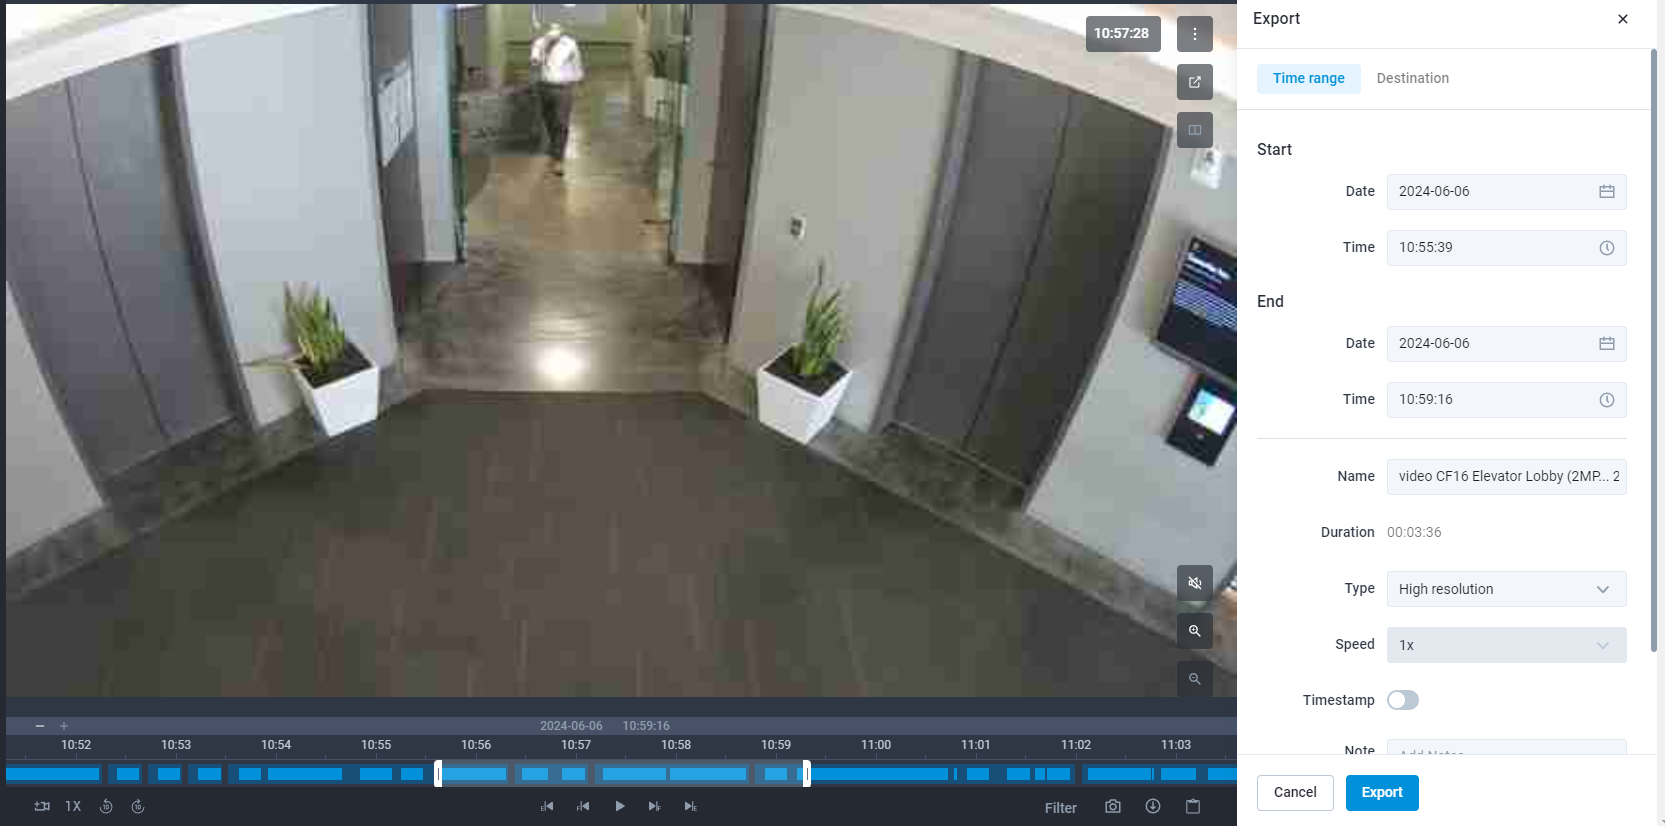 Image 2: Export Menu
An area is selected based on your selected position in the timeline when clicking ‘export.’ Your selection is highlighted in light gray with white markers on each end.
Click Type to see other options. The High Resolution option selects the full-resolution video, not a preview video. You can download the full video or the preview video. Select Preview Timelapse, and Speed appears. This speed applies to the preview video, and you can select up to 16 times normal speed. Bundle provides both the full and preview video. If you want to download a longer video segment, specify a beginning and end time at the top of the download dialogue. Once you click Export, a line item will appear under the Downloads tab where you can download your selected clip.
Image 3: Example Download Tab view
Archive Tab
Clicking Archive shows the Archive menu, where you can choose the location to save the video in your own cloud archive. Within this folder, you can also create folders to organize your saved video files.
Image 4: Example Archive view
The Archive lets you store your clips beyond your cloud retention period and share files and folders with a clickable link to anyone. Video File Details can be accessed from within the Archive view, and include by default the type of video (Video, Bundle, or Preview) followed by the name of the camera and the time. This will be the name of the MP4 video file or the name of the ZIP bundle of MP4 files. (You can change this name. Clicking on the 3-dot overflow menu, you will see various menu options appear, as mentioned below.)
Image 5: Example History Browser view
Under Details, there is a place for notes and tags under the Info tab. The name and the notes will be searchable later. Click the Time Stamp checkbox. Your video can have the date and time overlaid with the time zone included. From this menu, you can also copy the video link, share a link with a specific expiry date, and unshare a previously created link. This is utilized when you want to share a clip and review with someone else without downloading the video. Shares can be deleted or deprecated at any time. Viewing these clips does not require the reviewer to have an Brivo Eagle Eye Video account.